 admin1
Homemade Milk Kefir: Your Complete Guide to Making a Naturally Fermented Probiotic Drink at Home
Making homemade milk kefir is one of the easiest and most rewarding ways to enjoy a naturally fermented beverage packed with beneficial probiotics. This creamy, slightly tangy drink has been enjoyed for generations and is valued for its refreshing flavor, digestive benefits, and versatility. Whether you are interested in improving gut health, adding more fermented foods to your diet, or simply learning a traditional kitchen skill, homemade kefir is an excellent place to begin.
Unlike many store-bought fermented dairy products, homemade kefir gives you complete control over the ingredients and fermentation process. With just fresh milk and active kefir grains, you can create a delicious probiotic drink that can be enjoyed on its own or blended into smoothies, poured over cereal, mixed into salad dressings, or used in baking recipes.
One of the greatest advantages of making kefir at home is its affordability. Once you have healthy kefir grains, they continue to grow and reproduce with proper care, allowing you to prepare fresh batches again and again. This makes homemade kefir both economical and sustainable while giving you access to live cultures that are often more diverse than those found in commercially produced products.
Because homemade kefir contains naturally occurring beneficial bacteria and yeasts, it develops a pleasantly tart taste during fermentation. The flavor can be adjusted simply by changing the fermentation time. A shorter fermentation creates a mild and creamy drink, while a longer fermentation produces a stronger, tangier flavor that many fermented food enthusiasts enjoy.
Whether you’re a beginner or already familiar with fermented foods, learning how to make milk kefir is surprisingly simple. With only a few pieces of basic kitchen equipment and a little patience, you can produce fresh kefir regularly while discovering the fascinating process of natural fermentation.
Discover What Makes Milk Kefir Unique
Milk kefir is a cultured dairy beverage made by fermenting milk with live kefir grains. Despite their name, kefir grains are not actual grains like wheat or rice. Instead, they are clusters of beneficial bacteria and yeast held together in a natural protein and polysaccharide structure. Their appearance often resembles tiny cauliflower florets, although each batch may vary slightly in shape and size.
These living cultures work together during fermentation by consuming the natural sugars found in milk. As they feed, they produce lactic acid, enzymes, beneficial compounds, and carbon dioxide, transforming ordinary milk into a thick, creamy drink with a refreshing tang.
Unlike yogurt, which is generally made using only a handful of bacterial cultures, milk kefir naturally contains a much wider variety of microorganisms. Many traditional kefir cultures include dozens of different beneficial bacteria and yeasts working together in harmony. This remarkable microbial diversity is one reason kefir has become increasingly popular among people interested in digestive wellness and fermented foods.
Milk kefir has been enjoyed for centuries in regions of Eastern Europe and the Caucasus Mountains, where it became a valued part of everyday nutrition. Families carefully preserved their kefir grains and passed them from one generation to another, allowing this traditional fermentation method to continue for hundreds of years. Today, homemade kefir is enjoyed worldwide because it is simple to prepare, inexpensive, and naturally rich in probiotics.
Why Homemade Kefir Has Become So Popular
Interest in fermented foods has grown rapidly over recent years as more people discover the importance of supporting a healthy digestive system. Homemade milk kefir fits perfectly into this lifestyle because it offers both excellent nutrition and a satisfying homemade flavor.
Many people choose homemade kefir because they appreciate knowing exactly what goes into their food. There are no unnecessary additives, preservatives, artificial flavors, or excess sugars when you prepare it yourself using fresh ingredients.
Another reason for its popularity is convenience. Once your kefir grains become active, they can be reused continuously. Every new batch creates another opportunity to produce fresh probiotic-rich kefir without purchasing starter cultures repeatedly.
Homemade kefir is also incredibly versatile in the kitchen. It can be enjoyed chilled as a refreshing beverage, blended with fruit into smoothies, stirred into overnight oats, used instead of buttermilk in baking recipes, or incorporated into creamy dips and dressings. Its pleasant tang complements both sweet and savory dishes.
Because the fermentation process partially breaks down lactose, many individuals find kefir easier to digest than regular milk, although tolerance varies from person to person.
Nutritional Value of Homemade Milk Kefir
Milk kefir offers much more than a refreshing taste. It is naturally rich in nutrients that support a balanced diet while providing live probiotic cultures created during fermentation.
Depending on the type of milk used, homemade kefir typically provides high-quality protein that helps support muscle maintenance and overall wellness. It also contains calcium, phosphorus, potassium, vitamin B12, riboflavin, and other essential nutrients naturally present in dairy milk.
During fermentation, beneficial microorganisms produce enzymes and bioactive compounds that contribute to kefir’s unique nutritional profile. Scientists continue studying these naturally occurring compounds to better understand their role in digestive and overall health.
Many people enjoy including kefir as part of a balanced eating pattern because fermented dairy foods may help support a healthy gut microbiome. Regular consumption of probiotic-rich foods has been associated with maintaining digestive balance, supporting normal immune function, and contributing to overall wellness when combined with a healthy lifestyle.
It is important to remember that homemade kefir is a food rather than a medicine. While research into probiotics continues to expand, enjoying kefir as part of a varied and nutritious diet is the best approach.
Essential Equipment for Successful Fermentation
One of the best things about homemade kefir is that it requires very little specialized equipment. Most home kitchens already contain nearly everything needed to begin making fresh batches.
A clean glass jar serves as the primary fermentation container. Many people prefer using a 500 ml clip-top jar because it provides a secure seal while leaving adequate space for fermentation. Others enjoy using a regular wide-mouth glass jar covered with a clean cloth or paper towel secured with a rubber band. Both methods work well, and the choice often comes down to personal preference.
You will also need a fine sieve or straining funnel to separate the finished kefir from the grains after fermentation. A jug or mixing bowl makes transferring the kefir easier, while a wide-neck glass bottle or storage container is ideal for refrigerating the finished drink.
A spoon is helpful for gently stirring the kefir during straining. Since kefir grains are living cultures, many experienced home fermenters prefer using wooden, silicone, or plastic utensils whenever practical to handle them gently.
Keeping your equipment clean is one of the simplest ways to encourage consistent fermentation. Wash jars thoroughly between batches and avoid introducing food residue or contaminants that could interfere with the natural fermentation process.
Choosing Between Open and Closed Fermentation
Home kefir makers commonly use two different fermentation methods, each producing slightly different characteristics.
An open fermentation system uses a clean cloth or breathable cover placed over the jar. This allows limited airflow while protecting the milk from dust and insects. Some people enjoy the slightly more pronounced tang that this method can produce.
A closed fermentation system relies on a clip-top jar fitted with a rubber gasket. This creates a more controlled environment with reduced oxygen exposure. Many home fermenters find this method produces a smoother flavor with less yeast activity and a creamier consistency.
Neither approach is universally better than the other. Experimenting with both methods allows you to discover which flavor, texture, and fermentation style best suits your personal taste and kitchen environment.
Can You Make Kefir with Plant-Based Milk?
Many people enjoy experimenting with dairy-free alternatives, and kefir grains can often ferment several plant-based beverages. However, unlike dairy milk, not every plant milk contains enough natural sugars or nutrients to continuously support healthy kefir grains.
Soy milk is one of the most reliable dairy-free options. It often produces a pleasantly thick consistency while providing nutrients that help maintain active fermentation. Coconut cream is another popular choice because it creates a rich, creamy texture with a mildly tangy flavor that resembles cultured yogurt.
Oat milk can also be used when it contains sufficient natural carbohydrates. Choosing unsweetened varieties with minimal additives generally produces better results. Plant-based beverages should ideally contain approximately 3.5 grams of carbohydrates per 100 milliliters, giving the microorganisms an energy source during fermentation.
If kefir grains appear less active after repeated use in non-dairy milk, many experienced fermenters refresh them by placing them back into dairy milk for several batches. This allows the microorganisms to recover before being used again with plant-based alternatives.
Understanding the Fermentation Process
Making homemade kefir is a fascinating example of natural fermentation. Once the kefir grains are added to fresh milk, the beneficial bacteria and yeast immediately begin feeding on lactose, the natural sugar found in milk.
As fermentation progresses, the microorganisms produce lactic acid, which gradually thickens the milk while giving kefir its familiar fresh, tangy taste. Depending on room temperature, milk type, and the amount of kefir grains used, this transformation generally takes between 18 and 24 hours, although the first few batches may occasionally require a little longer.
Warm kitchens naturally speed up fermentation, while cooler environments slow it down. For this reason, there is no exact fermentation schedule that works perfectly every time. Learning to recognize visual signs of readiness is often more useful than relying strictly on the clock.
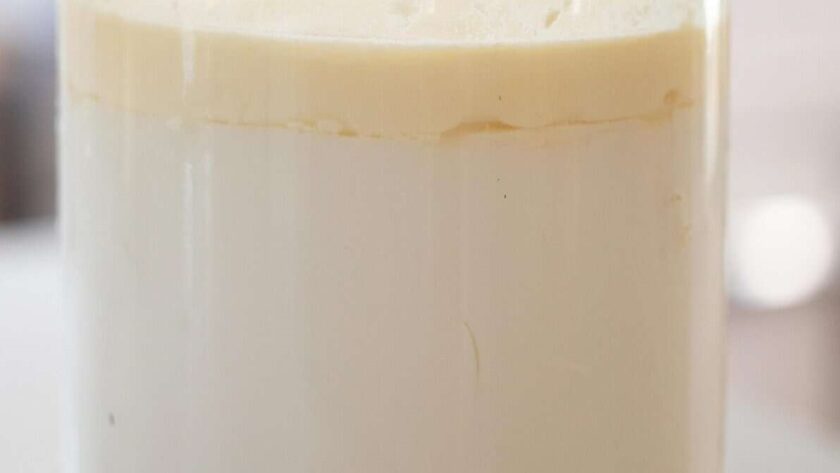
When fermentation is complete, the milk develops a yogurt-like consistency. Small pockets of clear or pale yellow liquid, known as whey, may appear throughout the jar. This is completely normal and simply indicates that fermentation has progressed well. Gentle stirring during straining easily blends the whey back into the finished kefir.
How to Know When Your Kefir Is Ready
One of the easiest ways to judge kefir is by observing its appearance and aroma.
Freshly fermented kefir becomes noticeably thicker than milk while remaining pourable. It should smell pleasantly tangy with mild yogurt-like notes rather than sour or unpleasant.
If the kefir has only lightly thickened after the expected fermentation period, allowing it to ferment for a few additional hours may improve the texture. Conversely, if the kefir becomes heavily separated into thick curds and large amounts of whey, it has simply fermented longer than intended. Fortunately, this does not usually ruin the batch. Stirring or whisking the kefir restores a smooth consistency before refrigeration.
As you continue making kefir, you’ll naturally learn the ideal fermentation time that produces the flavor and thickness your household enjoys most.
Straining and Preparing the Finished Kefir
After fermentation, the kefir grains must be separated from the cultured milk so they can be reused.
Pour the fermented milk through a fine sieve or straining funnel placed over a clean jug or bowl. The liquid kefir will pass through while the grains remain behind. If necessary, gently stir with a spoon to help the kefir move through the sieve without damaging the grains.
The grains are surprisingly durable and designed to be reused repeatedly. They should not be washed with water between batches because the beneficial microorganisms naturally coat their surface. Simply transfer them directly into fresh milk and begin another fermentation cycle.
The finished kefir may be enjoyed immediately, or it can be refrigerated for several hours to develop a cooler, smoother flavor.
Simple Ways to Add Natural Flavor
Homemade kefir is delicious on its own, but many people enjoy adding subtle natural flavors after straining.
A slice of fresh lemon peel provides a clean citrus aroma without overwhelming the fermented taste. A single drop of food-grade lemon oil can also create a refreshing finish while preserving the creamy texture.
Other optional additions include fresh berries, sliced peaches, vanilla extract, cinnamon, or a small amount of honey after fermentation. These ingredients are added only after the kefir has been strained so they do not interfere with the fermentation process.
Because the base kefir has a pleasantly tangy profile, it pairs beautifully with both sweet fruits and savory herbs depending on how you plan to serve it.
Proper Storage for Fresh Homemade Kefir
Once strained, homemade kefir should be transferred into a clean storage bottle with a secure lid and refrigerated promptly.
Cold temperatures slow the activity of the beneficial microorganisms, helping preserve the kefir’s mild flavor and creamy texture. Under proper refrigeration, homemade kefir generally maintains its best quality for approximately seven to ten days.
Because kefir remains a living fermented food, its flavor gradually becomes more pronounced during storage. Some people enjoy this stronger taste, while others prefer drinking it within the first few days for a milder experience.
If you produce kefir regularly, making one larger batch each week can provide a convenient supply without requiring daily preparation.
Caring for Your Kefir Grains
Healthy kefir grains can last indefinitely with proper care.
Between batches, the grains may remain covered with fresh milk at room temperature for up to one week if you continue making kefir regularly. For longer breaks, storing them in fresh milk inside the refrigerator allows them to rest for up to three weeks.
The milk surrounding stored grains should be replaced periodically so the microorganisms continue receiving nourishment. Without fresh milk, the living cultures eventually weaken.
As kefir grains grow, they naturally multiply. Every few weeks you may notice that the grains have doubled in size. Removing a portion helps maintain balanced fermentation while allowing you to share them with friends or preserve them for future use.
Helpful Tips for Consistent Results
Successful homemade kefir becomes easier with each batch. A few simple habits help produce reliable results every time.
Keep the fermentation jar away from direct sunlight, as excessive heat may affect microbial activity. Choose a stable room temperature location where the jar will not be disturbed frequently.
Avoid overfilling the jar, leaving enough headspace for natural fermentation. Clean equipment thoroughly between batches while handling the grains gently.
If your kefir develops a stronger flavor than expected, simply reduce the fermentation time during your next batch. Likewise, if you prefer a more pronounced tang, allowing the kefir to ferment for a few additional hours usually achieves the desired result.
Patience is especially important during the first few batches, particularly if your kefir grains have recently been shipped or stored. They often become more active after several successful fermentation cycles.
Frequently Asked Questions About Homemade Kefir
Many beginners wonder how much kefir they should drink when first introducing fermented foods into their diet. Since every digestive system responds differently, starting with a small serving and gradually increasing the amount over several days allows your body to adjust comfortably.
Another common question concerns separating curds and whey. This natural process simply indicates active fermentation and is not a sign that the kefir has spoiled. Stirring restores a smooth texture before serving.
People also ask whether kefir grains wear out over time. With proper care, regular feeding, and clean equipment, healthy kefir grains continue reproducing and making fresh batches for many years.
Homemade Milk Kefir Recipe
Fresh, Creamy Probiotic Kefir Made Right at Home
Recipe Overview
- Prep Time: 5 minutes
- Fermentation Time: 18–24 hours
- Total Time: About 1 day
- Yield: Approximately 1 pint (2 servings)
- Difficulty: Easy
- Cuisine: Traditional Fermented Dairy
- Category: Beverage
Ingredients
- ½ teaspoon active kefir grains
- 1 pint organic whole milk (recommended for the creamiest texture)
- 1 slice fresh lemon (optional, for flavor)
- OR 1 drop food-grade lemon oil (optional)
Equipment Needed
- 500 ml clip-top glass jar with rubber gasket or a clean glass jar covered with a cloth and secured with a rubber band
- Fine-mesh sieve or straining funnel
- Measuring jug or bowl
- Wide-neck glass bottle or storage container
- Spoon for gentle stirring
Step-by-Step Instructions
Step 1 – Combine the Ingredients
Place the kefir grains into a clean glass jar. Pour in the milk, leaving about 2 cm (¾ inch) of space at the top if using a clip-top jar, or around 5 cm (2 inches) if using a cloth-covered jar to allow room for fermentation.
Step 2 – Ferment the Milk
Leave the jar at room temperature, away from direct sunlight, for 18 to 24 hours.
The kefir is ready once the milk becomes noticeably thicker, similar to yogurt. It is completely normal if small pockets of whey appear or the mixture begins to separate slightly.
Step 3 – Pause Fermentation if Needed
If you’re unable to strain the kefir immediately, place the jar in the refrigerator. Chilling slows the fermentation process and helps prevent the flavor from becoming overly tangy. The kefir can be strained anytime within the next 48 hours.
Step 4 – Separate the Kefir Grains
Pour the fermented mixture through a fine sieve or straining funnel into a clean jug or bottle.
Use a spoon to stir gently if needed. The kefir grains are durable and can be reused for your next batch.
Step 5 – Flavor and Store
Enjoy the kefir immediately or add a slice of fresh lemon peel or one drop of lemon oil for a light citrus flavor.
Transfer the finished kefir to a clean bottle and refrigerate. For a stronger fermented taste, leave the strained kefir at room temperature for a few extra hours before chilling.
Properly refrigerated, homemade kefir keeps well for 7 to 10 days.
Step 6 – Start Your Next Batch
Rinse the fermentation jar with warm water and dry it well.
Return the kefir grains to the clean jar without washing the grains, add fresh milk, and repeat the fermentation process to make your next batch.
Helpful Tips
- Whole organic milk usually produces the thickest and creamiest kefir.
- Warmer temperatures shorten fermentation time, while cooler temperatures slow it down.
- If the kefir separates into curds and whey, simply stir it until smooth.
- Healthy kefir grains naturally grow over time. When they double in size, remove a portion to share, store, or freeze.
- Keep the fermentation jar out of direct sunlight for the best results.
Storage
- Finished Kefir: Refrigerate for 7–10 days in a sealed bottle.
- Kefir Grains: Store in a small jar covered with fresh milk.
- At room temperature: up to 1 week
- In the refrigerator: up to 3 weeks
- Replace the storage milk regularly if the grains are not being used.
Nutrition (Approximate Per Serving)
- Calories: 150 kcal
- Protein: 8 g
- Carbohydrates: 12 g
- Fat: 8 g
- Saturated Fat: 5 g
- Calcium: High
- Probiotics: Naturally occurring live cultures
Nutritional values are estimates and may vary depending on the type of milk used.
Recipe Notes
- Homemade kefir is naturally tangy and rich in live probiotic cultures.
- Flavor intensity depends on fermentation time.
- Lemon is optional but adds a fresh, bright finish.
- For best results, prepare fresh batches regularly to keep your kefir grains healthy and active.