 admin1
No-Bake Salted Caramel Cheesecake Cups for an Easy Dessert
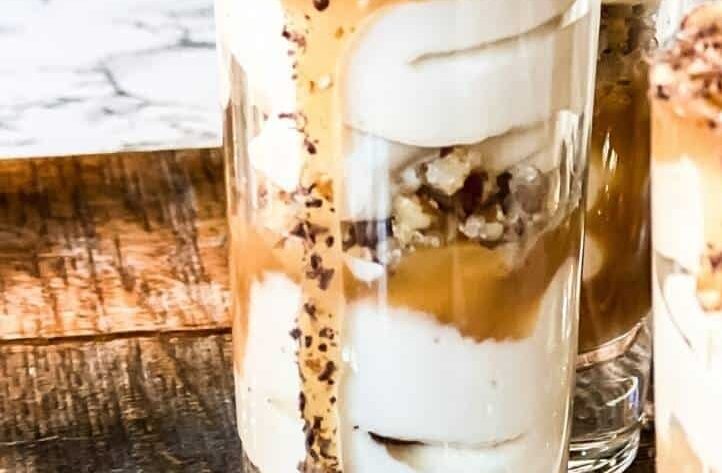
No-Bake Salted Caramel Cheesecake Cups are a rich, creamy, and wonderfully indulgent dessert that brings together a buttery Biscoff cookie crust, smooth cheesecake filling, and homemade salted caramel in individual portions. This easy no-bake cheesecake recipe is especially appealing when you want an impressive dessert without turning on the oven. Each cup delivers a delicious contrast of textures, from the crisp and buttery cookie base to the silky cream cheese filling and glossy caramel topping. The combination of sweet caramel, a subtle salty finish, vanilla, and tangy cream cheese creates a balanced flavor that feels luxurious without requiring complicated baking techniques. Because the cheesecakes are prepared in individual dessert cups, they are also convenient for dinner parties, family gatherings, celebrations, holidays, and make-ahead desserts. After several hours in the refrigerator, the filling becomes beautifully chilled and firm enough to spoon into while remaining soft, creamy, and satisfying.
Why This No-Bake Cheesecake Recipe Works So Well
The appeal of these salted caramel cheesecake cups comes from how easily a few familiar ingredients work together to create a restaurant-style dessert. Traditional cheesecake often requires a baked crust, a water bath, careful oven temperatures, and plenty of cooling time, but this version takes a much simpler approach. The Biscoff cookies provide a naturally spiced, caramelized foundation, while melted butter helps bind the crumbs into a firm but tender crust. The cheesecake filling relies on room-temperature cream cheese for smoothness, sugar for sweetness, vanilla for aroma, salted caramel for its signature flavor, and chilled heavy cream for a light, creamy texture. Instead of baking the mixture, the finished cups simply rest in the refrigerator until thoroughly chilled. This makes the recipe particularly useful for anyone searching for an easy cheesecake recipe, no-bake dessert, individual cheesecake recipe, or simple make-ahead dessert that can be prepared well before guests arrive.
The Flavor Combination of Caramel, Salt, and Cream Cheese
Salted caramel is the defining flavor of these cheesecake cups, and its sweet-and-salty character works beautifully with the creamy filling. Caramel on its own can sometimes taste intensely sweet, but the addition of salt creates contrast and gives the sauce more depth. Cream cheese adds a mild tang that balances the sweetness even further, while vanilla brings a warm background note that ties the flavors together. Biscoff cookies complement the caramel particularly well because their crisp texture and distinctive spiced sweetness make the crust much more flavorful than an ordinary plain cookie base. When all of these components are layered together, the result is a dessert with several flavors appearing at once without becoming overwhelming. The chilled temperature also helps the caramel, cheesecake, and cookie crust feel richer and more cohesive. For anyone who enjoys caramel cheesecake, Biscoff desserts, creamy cheesecake cups, or individual no-bake desserts, this combination offers plenty of appeal.
Making Homemade Salted Caramel From Scratch
The first caramel option uses granulated sugar, unsalted butter, heavy cream, vanilla extract, and salt to create a homemade salted caramel sauce. The key to getting good results is patience because caramel benefits from gentle, controlled heating rather than a rushed cooking process. A wide-bottomed, light-colored pan makes it easier to observe the changing color of the sugar as it melts. Begin with the sugar over the lowest flame and allow it to gradually melt from the bottom. At first, the sugar may look grainy, lumpy, or uneven, but this is part of the process. Slowly stirring with a dry utensil encourages the remaining sugar to melt. Continue heating gently until the sugar becomes completely liquid and develops a deep golden caramel color. Avoid rushing this stage because high heat can cause the sugar to burn before it has melted evenly. The finished caramel should have a rich golden-brown appearance and a smooth consistency before the remaining ingredients are incorporated.
How to Add Butter and Cream to Caramel Safely
Once the sugar has reached the desired caramel color, turn off the heat before adding the room-temperature butter. Whisk the butter into the caramel until it has melted completely. The mixture may appear separated at this point, but that does not necessarily mean anything has gone wrong. The next step is adding the warm heavy cream. Bringing the cream to a warm temperature before adding it helps the mixture combine more easily. When cream meets hot caramel, the sauce can become extremely bubbly and frothy, so it is important to add it carefully and whisk steadily. As the bubbling settles, the mixture should develop into a smooth caramel sauce. If the caramel becomes too thick or begins to seize, the lowest heat can be used briefly while gently stirring until the sauce loosens. Once the sauce is smooth, vanilla extract and salt can be mixed in. The caramel should then be transferred to a heat-safe container and allowed to cool completely to room temperature before it is added to the cheesecake filling.
A Convenient Caramel Alternative Using Chewy Candies
For those who prefer a shortcut, the second caramel option uses Werther’s Original Chewy Caramels, heavy cream, and salt. This method eliminates the process of melting granulated sugar and gives you a convenient caramel sauce without having to monitor the sugar as it changes color. Begin by placing the unwrapped candies and heavy cream into a nonstick saucepan. Keep the heat on the lowest flame and stir as the candies gradually melt into the cream. Continue gently cooking and stirring until the mixture becomes smooth and uniform. Once the caramel has fully melted, turn off the heat and stir in the salt. The sauce should then be transferred to a heat-safe container and cooled completely to room temperature. This alternative is especially useful when you want to save preparation time while still creating the characteristic caramel flavor needed for the cheesecake cups. Regardless of which caramel option you choose, allowing it to cool before combining it with the cream cheese mixture is essential.
Preparing the Biscoff Cookie Crust
The Biscoff cookie crust gives these individual cheesecakes their satisfying base and adds a delicious caramelized spice flavor. To prepare it, combine the cookies and melted unsalted butter in a food processor and process until the cookies become fine crumbs. The butter should distribute throughout the crumbs so that the mixture can be pressed into the dessert cups. Divide the crumb mixture evenly among six 7-ounce dessert cups. For an attractive presentation, try to distribute the crumbs as evenly as possible so each serving receives a similar amount of crust. Use the bottom of a narrow glass or another suitable tool to gently press the crumbs down. It is important not to pack the crust too tightly because an overly compacted cookie base can become difficult to spoon through once chilled. After the crusts are prepared, place the cups in the refrigerator while making the cheesecake filling. Chilling the crust helps it firm up and creates a stable foundation for the creamy layer.
Creating a Smooth Cream Cheese Cheesecake Filling
The cheesecake filling is designed to be creamy, silky, and light enough to enjoy directly from the refrigerator. Start by placing the room-temperature cream cheese, sugar, and vanilla into the bowl of a stand mixer fitted with the paddle attachment. Whisk the mixture for approximately two to three minutes, scraping down the sides of the bowl several times as needed. Using room-temperature cream cheese is important because cold cream cheese can remain lumpy and make it harder to achieve a smooth filling. Once the sugar has dissolved into the cream cheese mixture, add one-third cup of the cooled salted caramel sauce. Mix only until the caramel has been incorporated. Overmixing at this stage is unnecessary and can affect the final texture. The goal is a uniform cream cheese mixture with a smooth appearance and a rich caramel flavor. This mixture forms the flavorful foundation of the no-bake cheesecake filling.
Whipping Heavy Cream for a Light Cheesecake Texture
The chilled heavy cream provides the airy quality that makes this cheesecake filling feel soft and luxurious instead of dense. Pour the chilled cream into a separate bowl and whisk until medium peaks form. At this stage, the cream should have noticeably thickened and should begin to hold its shape when the whisk is lifted. It does not need to be beaten until extremely stiff because the cream will be folded into the cream cheese mixture. Using a rubber spatula, gently fold the whipped cream into the caramel cream cheese mixture. Folding rather than vigorously stirring helps maintain the creamy, light texture created by the whipped cream. Work slowly and carefully until the mixture looks evenly combined and silky. Once finished, the cheesecake mixture should be thick enough to spoon or spread into the prepared cups while remaining smooth and creamy. This step is one of the most important parts of creating the pleasant texture associated with a good no-bake cheesecake.
Assembling the Individual Cheesecake Cups
Once the crusts and cheesecake filling are ready, assembling the individual desserts is straightforward. Remove the chilled cups containing the Biscoff crust from the refrigerator and divide the cheesecake mixture evenly among them. Try to fill each cup to a similar level for a polished presentation. A spoon, piping bag, or small spatula can be used to transfer the filling, although a spatula is particularly helpful for smoothing the tops. Spread the cheesecake layer evenly so that the surface is ready for the final caramel topping. Individual cups make this dessert especially convenient because there is no need to slice a large cheesecake or worry about whether each portion will hold its shape on a plate. After the filling has been distributed, place all six cups in the refrigerator. They should chill for four to six hours or, preferably, overnight. This extended refrigeration time allows the filling to become thoroughly chilled and gives the flavors time to settle together.
Why Refrigerating the Cheesecake Cups Is Important
Refrigeration is not simply a final step; it plays an important role in the texture and serving quality of these no-bake cheesecake cups. The chilled environment allows the cream cheese filling and whipped cream to firm up gradually while keeping the dessert smooth and creamy. If the cups are served too soon, the filling may be softer than intended and the layers may not feel as cohesive. Four to six hours provides enough time for the cheesecake to become thoroughly chilled, while an overnight rest is convenient when preparing dessert ahead of a special meal. Because the dessert is assembled in individual containers, the cups can remain covered and refrigerated until they are ready to serve. This make-ahead quality makes the recipe particularly useful for entertaining. Preparing the cheesecake cups the evening before can also reduce the amount of work required on the day of a celebration, leaving only the final caramel drizzle and optional whipped cream decoration.
Adding the Salted Caramel Topping
The final caramel layer gives these cheesecake cups their glossy, decadent finish. Before serving, take the remaining salted caramel sauce and warm it gently in the microwave for approximately ten to fifteen seconds. The goal is to make the caramel fluid enough to drizzle without making it hot. A sauce that is too warm can soften the cheesecake surface, so use short heating intervals and check the consistency before adding it. Approximately one-half tablespoon of caramel can be drizzled over each chilled cheesecake cup and spread gently across the surface. This creates a beautiful caramel topping while reinforcing the salted caramel flavor found inside the cheesecake. If the caramel has become very thick after cooling, a few additional seconds of gentle warming may help, but it should remain only slightly warm and pourable. The combination of pale creamy cheesecake and golden caramel creates an attractive dessert that looks elegant despite the simple preparation process.
Optional Whipped Cream Decoration
Whipped cream is optional, but it can make the individual cheesecake cups look especially inviting when served to guests. If you choose to use it, whip the one cup of chilled heavy cream to stiff peaks. The cream should be thick enough to hold a decorative shape when piped. A piping bag fitted with a decorative tip can be used to add a small swirl to each cheesecake, or the whipped cream can simply be spooned on top for a more relaxed presentation. Since the salted caramel already provides plenty of flavor and visual appeal, the whipped cream does not need to be excessive. A small amount adds softness and creates another textural contrast without overpowering the caramel and cream cheese. For parties, birthdays, dinner gatherings, holiday meals, or dessert tables, individual portions topped with whipped cream and caramel can look polished and thoughtfully prepared while requiring very little last-minute work.
Best Tips for Smooth No-Bake Salted Caramel Cheesecake
A few preparation details can make a noticeable difference in the final result. First, use room-temperature cream cheese so that it blends smoothly with the sugar and vanilla. Second, make sure the salted caramel added to the filling has cooled completely to room temperature. Warm caramel can change the consistency of the cream cheese mixture. Third, use chilled heavy cream when whipping it so that it thickens properly. When folding the whipped cream into the filling, use gentle movements rather than vigorous mixing. For the cookie crust, press the crumbs firmly enough to create a base but avoid compressing them excessively. When preparing caramel from scratch, low heat and patience are essential because sugar can burn quickly when heated too aggressively. Finally, allow the finished cheesecake cups enough refrigerator time to become thoroughly chilled. These small details help produce a dessert with a smooth filling, stable crust, rich caramel flavor, and attractive presentation.
Common Questions About These Cheesecake Cups
One common question is whether these cheesecakes need to be baked, and the answer is no. They are specifically designed as a no-bake dessert and set through refrigeration. Another question concerns the caramel: either of the two listed caramel methods can be used, so the choice depends on whether you prefer homemade caramel from sugar or the convenience of using chewy caramel candies. It is also important to use the listed cream cheese and heavy cream quantities as provided because changing the balance can affect the texture. The cheesecake cups can be prepared several hours ahead or refrigerated overnight, making them convenient for entertaining. They should be served cold because refrigeration is essential to their intended texture. The optional whipped cream topping can be added immediately before serving. If the caramel topping has become firm in the refrigerator, gently warming it for a short period will make it easier to drizzle.
How to Serve and Present Salted Caramel Cheesecake Cups
These individual cheesecakes are best served cold directly from the refrigerator. The dessert cups make portioning simple and eliminate the need for slicing, plating, and transferring individual cheesecake pieces. For an elegant presentation, keep the caramel drizzle centered over the cheesecake and add a small swirl of whipped cream if desired. Serving the dessert in clear cups also allows guests to see the layers of Biscoff crust and creamy caramel cheesecake. These cups are suitable for dinner parties, holiday gatherings, birthdays, family celebrations, potlucks, and casual weekend desserts. Because they can be prepared ahead of time, they are also practical when several dishes need to be prepared at once. The contrast between the buttery cookie crust, creamy filling, and salted caramel topping makes every spoonful rich and satisfying. Keeping the portions individual also makes the dessert feel special without requiring elaborate decoration or complicated pastry skills.
Make-Ahead Storage and Preparation Notes
The make-ahead nature of these no-bake cheesecake cups is one of their biggest advantages. Once assembled, the cups should remain refrigerated until serving so that the cheesecake filling stays properly chilled. If preparing them the day before, allow the cheesecake cups to chill overnight and add the caramel topping when you are closer to serving time. Keeping the caramel separate until the final stage can make the topping easier to control and helps maintain a glossy appearance. If the caramel thickens while standing, gently warm it until it becomes pourable again, taking care not to make it hot. The optional whipped cream is also best added shortly before serving. When planning a dinner or celebration, this recipe can therefore be divided into several convenient stages: make the caramel, prepare the crust, mix the filling, chill the cups, and finish with caramel and whipped cream. This approach keeps preparation organized and makes the dessert easy to manage.
Why This Dessert Is Perfect for Entertaining
Individual no-bake cheesecake cups are especially useful when serving a group because every guest receives a complete dessert rather than a slice from a larger cake. There is no cutting board, cake knife, or concern about uneven portions. The six dessert cups specified in the recipe are also easy to arrange on a tray and refrigerate together. The flavors are familiar enough to appeal to many dessert lovers, while the salted caramel and Biscoff combination gives the recipe a more distinctive character than a basic cheesecake. Since most of the preparation can be completed in advance, the recipe leaves very little work for the final serving period. This makes it a strong option for holidays, family dinners, birthdays, celebrations, and special occasions when you want a homemade dessert that looks impressive but does not require baking. The combination of convenience, rich flavor, and individual presentation is what makes this recipe such a useful addition to a collection of easy dessert recipes.
Final Thoughts on This Easy Salted Caramel Cheesecake Recipe
No-Bake Salted Caramel Cheesecake Cups bring together everything that makes a chilled dessert appealing: a buttery cookie crust, a creamy cheesecake center, rich caramel, and a delicate salty finish. The recipe avoids the complexity of traditional baked cheesecake while still delivering an indulgent dessert with layers of flavor and texture. Choosing between the homemade caramel sauce and the candy-based alternative gives you flexibility depending on your available time and preferred preparation method. Once the components are prepared, assembly is simple, and refrigeration does most of the remaining work. The finished cups can be decorated with caramel and optional whipped cream just before serving for an attractive presentation. Whether you are looking for an easy no-bake cheesecake, a Biscoff cheesecake dessert, a salted caramel recipe, or an individual make-ahead dessert, these cheesecake cups offer a practical and delicious option that can be prepared without turning on the oven.
Structured Recipe Card
No-Bake Salted Caramel Cheesecake Cups
Description:
Creamy individual no-bake cheesecake cups made with a buttery Biscoff cookie crust, smooth caramel cheesecake filling, and a rich salted caramel topping. The recipe includes two salted caramel preparation options and can be chilled several hours or overnight for an easy make-ahead dessert.
Preparation & Cooking Duration:
Preparation: Approximately 30–40 minutes, depending on the caramel method
Caramel Cooking: Approximately 15+ minutes for the from-scratch option
Chilling: 4–6 hours or overnight
Serving Preparation: Approximately 5–10 minutes
Serving:
6 dessert cups, approximately 7 oz each
Ingredients
Salted Caramel Sauce — Option 1: From Scratch
- ¾ cup granulated sugar (150g)
- 4 tbsp unsalted butter, room temperature and sliced (56g)
- ⅓ cup heavy cream, room temperature (80g)
- 1 tsp vanilla extract
- ¾ tsp salt
Salted Caramel Sauce — Option 2: With Candy
- 20 Werther’s Original Chewy Caramels
- 2 tbsp heavy cream
- ½ tsp salt
Biscoff Crust
- 200g Biscoff cookies (about 26 cookies)
- 6 tbsp unsalted butter, melted (85g)
Cheesecake Filling
- 16 oz cream cheese, room temperature (450g)
- ⅓ cup sugar (65g)
- 1 tsp vanilla
- ⅓ cup salted caramel sauce from option 1 or option 2 above
- ⅔ cup heavy cream, chilled (160g)
Optional Serving
- 1 cup heavy cream, chilled (240g)
Step-by-Step Instructions
1. Prepare the Salted Caramel — From-Scratch Option
Place the granulated sugar in a wide-bottomed, light-colored pan. Heat over the lowest flame. Once the sugar begins melting underneath, slowly stir it with a dry utensil to encourage even melting. Continue gently heating and stirring until all the sugar has melted and the color becomes a deep golden caramel. This can take 15 minutes or longer depending on the pan and stove.
2. Finish the Homemade Caramel Sauce
Turn off the heat and add the room-temperature butter. Whisk until completely melted. Add the warm heavy cream and whisk carefully as the mixture will bubble and foam. Once smooth, add the vanilla extract and salt. Transfer the finished caramel to a heat-safe glass bowl or jar and allow it to cool completely to room temperature.
3. Prepare the Caramel — Candy Option
Place the unwrapped Werther’s Original Chewy Caramels and heavy cream in a nonstick saucepan. Heat over the lowest flame, stirring continuously until the candies melt and a smooth sauce forms. Turn off the heat, mix in the salt, and transfer the caramel to a heat-safe container. Allow it to cool completely to room temperature.
4. Make the Biscoff Crust
Place the Biscoff cookies and melted butter into a food processor. Process until a fine crumb mixture forms. Divide the mixture evenly between six 7-ounce dessert cups. Gently press the crumbs down with the bottom of a narrow glass. Avoid packing the crust too tightly. Refrigerate the prepared cups while making the filling.
5. Mix the Cream Cheese Base
Place the room-temperature cream cheese, sugar, and vanilla in the bowl of a stand mixer fitted with the paddle attachment. Mix for 2–3 minutes until the sugar is incorporated and the mixture is smooth. Scrape down the bowl several times during mixing.
6. Add the Salted Caramel
Pour ⅓ cup of the completely cooled salted caramel sauce into the cream cheese mixture. Mix just until combined. Avoid unnecessary overmixing.
7. Whip the Heavy Cream
In a separate bowl, whisk the chilled heavy cream until medium peaks form. The cream should become thick and begin holding its shape.
8. Fold the Whipped Cream Into the Filling
Using a rubber spatula, gently fold the whipped cream into the caramel cream cheese mixture. Continue carefully until the filling becomes evenly combined and silky smooth.
9. Fill the Dessert Cups
Divide the cheesecake mixture evenly among the chilled Biscoff crusts. Smooth the surface of each cheesecake cup with a knife or spatula.
10. Chill the Cheesecakes
Refrigerate the filled dessert cups for 4–6 hours or overnight, until thoroughly chilled and set.
11. Add the Caramel Topping
Before serving, gently microwave the remaining salted caramel sauce for approximately 10–15 seconds, just until it becomes runny. Drizzle approximately ½ tablespoon over each cheesecake cup and spread it gently across the top.
12. Add Optional Whipped Cream and Serve
For decoration, whip the chilled heavy cream to stiff peaks and pipe it onto the cheesecake cups. Serve the cheesecakes cold.
Nutritional Information
Nutritional values can vary depending on the specific brands and products used, as well as whether the homemade caramel or candy caramel option is selected. For the most accurate nutrition information, calculate the recipe using the exact ingredient labels and quantities used during preparation.
Notes
Caramel Preparation: The from-scratch caramel requires low heat and patience. Avoid using high heat because the sugar can burn before melting evenly.
Cream Temperature: The butter and cream used for the homemade caramel should be at room temperature or warm as specified. The caramel itself must cool completely before being mixed into the cheesecake filling.
Cream Cheese: Use room-temperature cream cheese for the smoothest filling and easiest mixing.
Whipped Cream: The heavy cream used in the cheesecake filling should be chilled before whipping. Fold it gently into the cream cheese mixture to maintain a soft, creamy texture.
Crust Texture: Press the Biscoff crumbs gently into the cups. Packing them too firmly can make the crust difficult to spoon through.
Chilling: Do not skip the refrigeration period. The cheesecake cups need 4–6 hours or overnight to become thoroughly chilled.
Caramel Topping: Warm the caramel only until it becomes pourable. It should not be hot when added to the chilled cheesecake.
Serving: Keep the finished cheesecake cups refrigerated until ready to serve and enjoy them cold.