 admin1
Homemade Amish White Bread – A Classic Soft Loaf That Never Goes Out of Style
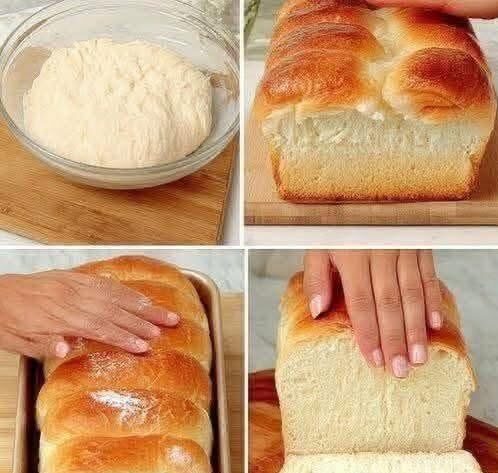
There is something incredibly comforting about baking a loaf of fresh white bread from scratch. The warm aroma filling the kitchen, the golden crust fresh from the oven, and the soft, fluffy slices waiting to be enjoyed are enough to make anyone appreciate homemade baking. This Homemade Amish White Bread recipe is inspired by the traditional bread baked in Amish homes, where simple ingredients and time-tested methods create delicious food without unnecessary complexity. The result is a light, tender loaf with a delicate sweetness, making it perfect for sandwiches, toast, French toast, garlic bread, or simply served warm with butter.
Unlike many store-bought breads that contain preservatives and artificial ingredients, homemade white bread gives you complete control over what goes into every loaf. Using pantry staples like all-purpose flour, active dry yeast, sugar, vegetable oil, salt, and warm water, you can create bakery-quality bread that tastes fresh, wholesome, and satisfying. Whether you are a beginner baker or someone with years of bread-making experience, this recipe is easy to follow and consistently produces excellent results.
Why This Traditional Bread Recipe Is So Popular
One reason this bread has remained popular for generations is its simplicity. Amish cooking focuses on practical recipes that use everyday ingredients while delivering dependable results. This bread perfectly reflects that philosophy. The dough is easy to prepare, rises beautifully, and bakes into soft loaves with a tender crumb and golden exterior.
Its slightly sweet flavor makes it incredibly versatile. Unlike artisan breads with chewy crusts or sour flavors, Amish white bread has a mild taste that pairs well with nearly everything. It complements breakfast spreads, lunch sandwiches, hearty soups, casseroles, and even desserts like bread pudding.
Families especially appreciate this recipe because it creates two generous loaves, making it ideal for meal preparation or freezing for later use.
What Makes Amish White Bread Different?
Traditional Amish white bread stands out because of its wonderfully soft texture and balanced flavor. A small amount of sugar not only adds gentle sweetness but also feeds the yeast, helping the dough rise into beautifully airy loaves.
Vegetable oil contributes moisture, creating slices that remain soft for several days. Combined with proper kneading and rising time, these ingredients produce bread that is fluffy yet sturdy enough for sandwiches without crumbling apart.
The recipe also avoids unnecessary complications. There are no specialty flours, expensive equipment, or advanced baking techniques required. Instead, patience and careful preparation allow the dough to develop naturally.
Choosing the Right Ingredients
Excellent bread begins with quality ingredients. Since this recipe contains only a handful of components, each one plays an important role in creating the perfect loaf.
All-purpose flour provides the structure needed while still producing a soft crumb. Active dry yeast serves as the leavening agent that allows the dough to expand during rising. Warm water activates the yeast and starts fermentation, while sugar provides food for the yeast and contributes subtle sweetness.
Vegetable oil keeps the bread moist and tender while helping extend freshness. Salt balances the sweetness and strengthens the gluten structure, resulting in better texture and flavor.
Using fresh yeast and accurately measuring the ingredients significantly improves the final outcome.
Understanding the Importance of Yeast
Yeast is one of the most fascinating ingredients in baking. It is a living organism that consumes sugar and releases carbon dioxide gas. Those tiny bubbles become trapped within the dough, causing it to rise and creating the soft interior everyone loves.
Proper water temperature is essential for activating yeast successfully. Water that is too hot may destroy the yeast cells, while water that is too cool slows activation dramatically. Warm water between 110°F and 115°F provides the ideal environment for healthy yeast growth.
Once activated, the yeast mixture becomes bubbly and foamy, signaling that it is ready to use.
Mixing the Dough Correctly
After activating the yeast, the remaining ingredients are gradually incorporated to create a soft dough. Flour should be added one cup at a time instead of all at once. This helps prevent overly dry dough while allowing adjustments based on humidity and flour absorption.
The finished dough should feel soft, slightly tacky, and easy to handle without sticking excessively to your hands. If too much flour is added, the finished bread may become dense instead of fluffy.
A wooden spoon works perfectly for mixing by hand, while a stand mixer fitted with a dough hook can make the process even easier.
Why Kneading Matters
Kneading is one of the most important stages in bread making. During kneading, gluten develops into a stretchy network that traps gases produced by the yeast.
Properly kneaded dough becomes smooth, elastic, and resilient. It stretches instead of tearing and feels silky to the touch.
Hand kneading typically takes six to eight minutes, while a stand mixer completes the process in about five minutes. Avoid adding unnecessary flour during kneading unless the dough becomes unmanageably sticky.
Well-developed gluten ensures tall, soft loaves with an even crumb.
The Magic of the First Rise
Once kneaded, the dough rests in a lightly greased bowl where it undergoes its first rise. During this period, yeast continues producing gas, allowing the dough to double in size.
A warm, draft-free environment encourages steady fermentation. Depending on room temperature, this usually takes one to one and a half hours.
Patience is important during this stage. Rushing the rise may result in heavy bread, while allowing adequate time develops both texture and flavor.
Watching the dough slowly expand is one of the most rewarding parts of homemade bread baking.
Shaping Beautiful Bread Loaves
After the first rise, gently press down the dough to release excess gas without overworking it. Dividing the dough into equal portions helps produce evenly sized loaves.
Each portion should be rolled tightly before placing it into greased loaf pans. Proper shaping creates attractive loaves with smooth tops and consistent slices after baking.
The second rise allows the shaped dough to become light and airy once again before entering the oven.
Why the Second Rise Is Essential
Many beginning bakers underestimate the importance of the second rise. This final proof allows the dough to relax after shaping while building additional volume.
The dough should rise slightly above the rim of the loaf pans before baking. This creates taller loaves with softer interiors and a beautiful rounded top.
If baked too early, the bread may become compact. If allowed to over-proof, it may collapse during baking.
Careful timing produces the perfect balance.
Baking Until Golden Brown
Preheating the oven ensures consistent baking from the moment the loaves enter the heat.
As the bread bakes, the yeast experiences one final burst of activity before stopping completely. Meanwhile, the crust develops its rich golden color while the interior finishes cooking.
A properly baked loaf should sound hollow when gently tapped on the bottom. This simple test helps determine doneness without cutting into the bread too early.
Cooling the bread on wire racks prevents condensation from softening the crust.
Serving Fresh Homemade Bread
Fresh Amish white bread is wonderfully versatile. Warm slices spread with butter create a comforting breakfast or afternoon snack.
The bread also makes exceptional peanut butter sandwiches, grilled cheese, turkey sandwiches, tuna melts, breakfast toast, avocado toast, cinnamon toast, and homemade garlic bread.
Its soft texture also makes it an excellent choice for French toast, bread pudding, stuffing, homemade croutons, or breadcrumbs.
Few homemade foods offer this level of versatility.
Helpful Tips for Consistent Results
Always measure flour correctly by spooning it into measuring cups before leveling it off. Scooping directly from the bag can pack too much flour into the cup.
Use fresh yeast within its expiration date for reliable rising.
Avoid adding all the flour immediately because humidity affects absorption rates.
Allow sufficient rising time rather than watching the clock alone. The dough should double in size regardless of how long it takes.
Cool the bread completely before slicing to preserve its soft texture.
These simple habits greatly improve baking success.
Storing Homemade Bread
Homemade bread contains no preservatives, making proper storage important.
Once completely cooled, store the loaves inside airtight containers or resealable bags at room temperature. Properly stored bread stays fresh for several days.
For longer storage, wrap each loaf tightly in plastic wrap followed by aluminum foil before freezing. Frozen bread maintains excellent quality for several months.
Individual slices may also be frozen, making it easy to thaw only what you need.
Common Mistakes to Avoid
Using water that is too hot can kill the yeast before it begins working.
Adding excessive flour creates dry, dense bread.
Skipping adequate kneading prevents proper gluten development.
Under-proofing results in heavy loaves, while over-proofing can cause the bread to collapse.
Cutting warm bread immediately releases steam too quickly, affecting texture.
Avoiding these common mistakes helps produce bakery-style bread every time.
Why You’ll Love Making This Recipe Again
This Homemade Amish White Bread recipe is one of those dependable kitchen classics that becomes a family favorite after the very first bake. It combines simple ingredients, easy preparation, and consistently delicious results into one timeless recipe that belongs in every home baker’s collection.
Whether you are baking for your family, preparing homemade sandwiches, serving holiday dinners, or simply enjoying warm bread with butter, this recipe delivers exceptional flavor and texture every single time.
From the first rise to the final slice, every step reflects the satisfaction of traditional homemade baking. Once you experience the softness, gentle sweetness, and fresh aroma of this bread, you’ll discover why generations of home bakers continue returning to this beloved recipe year after year.
Homemade Amish White Bread Recipe
Preparation Time
- Prep Time: 20 minutes
- First Rise: 1 to 1½ hours
- Second Rise: 30 to 45 minutes
- Bake Time: 25 to 30 minutes
- Total Time: About 2½ to 3 hours
- Yield: 2 (9×5-inch) loaves
- Servings: 20–24 slices
Ingredients
- 6 to 7 cups all-purpose flour, divided
- 2 cups warm water (110°F–115°F / 43°C–46°C)
- ½ cup granulated sugar
- 1½ tablespoons active dry yeast
- ¼ cup vegetable oil
- 2 teaspoons salt
Optional (for extra softness):
- Lightly brush the tops with melted butter after baking.
Step-by-Step Instructions
Step 1: Activate the Yeast
Pour the warm water into a large mixing bowl. Add the sugar and stir until dissolved. Sprinkle the active dry yeast over the water and let it rest for 5–10 minutes until it becomes foamy. This indicates the yeast is active and ready.
Step 2: Prepare the Dough
Mix the vegetable oil and salt into the yeast mixture.
Gradually add the flour, one cup at a time, stirring after each addition. Continue until a soft dough forms and begins pulling away from the sides of the bowl. You may not need the entire amount of flour.
Step 3: Knead
Transfer the dough to a lightly floured surface.
Knead for 6–8 minutes until smooth, soft, and elastic.
If using a stand mixer fitted with a dough hook, knead on medium speed for about 5 minutes.
Step 4: First Rise
Shape the dough into a smooth ball.
Place it in a lightly greased bowl, turning once to coat all sides.
Cover with plastic wrap or a clean kitchen towel.
Let rise in a warm, draft-free place for 1 to 1½ hours, or until doubled in size.
Step 5: Shape the Loaves
Gently press down the risen dough to release excess air.
Divide it evenly into two portions.
Shape each portion into a loaf and place into greased 9×5-inch loaf pans.
Cover loosely and allow to rise for another 30–45 minutes, or until the dough rises slightly above the tops of the pans.
Step 6: Bake
Preheat the oven to 350°F (175°C).
Bake for 25–30 minutes, or until the tops are golden brown and the loaves sound hollow when tapped.
If desired, brush the tops with melted butter immediately after baking for a softer crust.
Remove from the pans and cool completely on wire racks.
Serving Ideas
Enjoy this homemade bread:
- Toasted with butter
- With fruit jam or honey
- For sandwiches
- Grilled cheese
- French toast
- Garlic bread
- Bread pudding
- Homemade croutons
Helpful Baking Tips
- Use warm—not hot—water to activate the yeast.
- Add flour gradually since humidity affects how much flour is needed.
- Knead until the dough is smooth and elastic.
- Allow the dough to fully double during the first rise.
- Avoid slicing while the bread is still warm to maintain its texture.
- Use fresh yeast for the best rise.
Storage
Room Temperature:
Store cooled bread in an airtight container or bread bag for up to 4 days.
Refrigerator:
Refrigeration is generally not recommended, as it can dry out the bread.
Freezer:
Wrap each loaf tightly in plastic wrap followed by aluminum foil or place in a freezer-safe bag. Freeze for up to 3 months.
Thaw at room temperature before serving.
Recipe Variations
- Brush the tops with butter for an extra-soft crust.
- Sprinkle oats or sesame seeds over the loaves before baking.
- Replace a small portion of the all-purpose flour with bread flour for a slightly chewier texture.
- Add a teaspoon of honey along with the sugar for a subtle flavor boost.
Frequently Asked Questions
Why didn’t my bread rise?
Inactive yeast, water that was too hot, or a cool room can prevent proper rising.
Can I use bread flour?
Yes. Bread flour creates a slightly chewier loaf while maintaining a soft interior.
Can I freeze the dough?
Yes. After the first rise, shape the dough, wrap well, and freeze. Thaw overnight in the refrigerator before allowing the second rise and baking.
How do I know when the bread is fully baked?
The crust should be golden brown, and the loaf should sound hollow when tapped on the bottom.
Nutrition Information (Approximate Per Slice)
- Calories: 165
- Carbohydrates: 31g
- Protein: 4g
- Fat: 3g
- Saturated Fat: 0.5g
- Sodium: 190mg
- Sugar: 4g
- Fiber: 1g
Nutritional values are estimates and may vary depending on the ingredients used.
Recipe Notes
This classic Homemade Amish White Bread produces two soft, fluffy loaves with a delicate sweetness and tender crumb. It’s an excellent everyday bread for toast, sandwiches, and family meals. With simple pantry ingredients and easy-to-follow steps, it’s a dependable recipe you’ll enjoy baking again and again.
Source: This recipe is an original rewrite inspired by traditional Amish White Bread recipes and standard home baking techniques. All text has been uniquely rewritten for originality and SEO purposes.